Tips For Buying a Used Bike
These few simple tests can help you avoid some nasty surprises and hefty post-purchase repair bills.
These few simple tests can help you avoid some nasty surprises and hefty post-purchase repair bills.
Simple Tests when considering a Second Hand Road Bike.
Bicycles are like cars – new ones depreciate radically as soon as you leave the store. And so it can make great economic sense for a novice cyclist to buy used rather than new.
An advantage though of used bicycles over used cars is that bikes are relatively simple mechanically; all the moving parts are in plain view and nothing costs very much to repair or replace. There is no engine for example that, if ill-maintained, might blow up and turn into a cripplingly expensive repair job.
Furthermore, while the bike companies would like you to believe that This Year's Model really is the latest and greatest, bicycle design and technology has not changed radically over the past 30 years, since the advent of STI handlebar shifting. An older but high quality bike of can be perfectly adequate for most cyclists.
Nonetheless, there are a few simple tests a second hand bike buyer – even if you know nothing about bike mechanics – can use to minimize the risk of disappointment and expensive maintenance and upgrades. Or you should at least be able to estimate how much work and investment will be required to get a used bike road ready, even if you don't plan to do any of the work yourself. (If you had to correct all the small problems listed below, for instance, you would have to cough up some $500 extra in addition to the cost of the bike.)
Chain wear (labour $15 + parts $25 to $75)
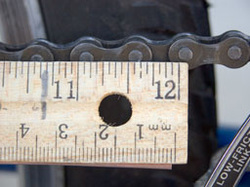
Chains have to be replaced periodically, every year or two depending on your mileage. A new chain can cost as much as $75 (for a 10 speed system though 8 and 9 speed chains are about half that price) plus another $15 to have a bike shop install it. Furthermore, a worn chain can excessively wear the front chain rings and rear sprockets, requiring their replacement too. Suddenly, you are in for several hundreds of dollars.
TEST: A worn chain is easy to spot. For $10 you can buy a chain checking tool at a bike shop (if you are going to keep riding in the future, you should have one in your tool kit). Slip the pins between the chain links and the tool (there are several styles) shows whether a chain should be replaced.
An easier test that requires no special tools is to simply use a tape measure to measure pin center-to-pin center over 12 double links. A new or near new chain will measure EXACTLY twelve (12) inches. Anything more than 1/16th” or maximum 1/8th” more than 12 and a replacement chain should be budgeted.
HEADSET (adjust $20; replace: $30 + parts $30 to $100)
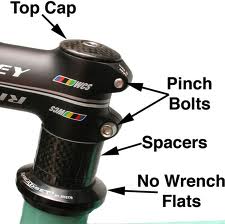
The headset are all the bits that allows the fork and steering system (handlebars, fork) to rotate easily in the bike's headtube (the short vertical tube at the front of the frame). There are bearings in the “cups” on the top and bottom of the headtube. The bearings can dry out or get grit in them and so the headset should be overhauled every couple of years (though it is often neglected for years or forever.)
TESTS:
TESTS:
- Squeeze the front brake closed. Rock the bike back and forth. There should be no play; it should feel be solid. Play indicates that the headset is at best too loose (an easy adjustment) but could also hide a worn headset needing complete replacement.
- Pick the front end off the ground and turn the bars left and right. There should be no grinding, tightness or noise. Again, this could indicate the need for an simple adjustment (loosening the headset slightly) or it could mean the bearings (cheap - $30) or the headset (moderate - $50 to $100) need replacing.
- Raise the entire bike off the ground but balanced so the front end is lower than the back wheel. Turn and release the bars. They should swing easily past and then back to center. If you can feel a the headset “clunk” into one single setting, as if into a slot, then the headset is damaged beyond adjustment and needs to be replaced. ($100+)
Wheel Hubs
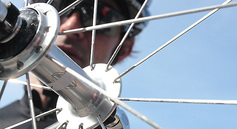
Like headsets, bad or worn wheel hubs (at the centre of the wheel) are fiddly and need to be tackled (repacking the bearings) by a bike shop. While not crazy expensive (about $25 per hub) it puts your bike out of commission for several days. Or, if they are really rough, you may have to invest $200+ in a new set of wheels.
TEST: Remove the wheels. Hold the outsides of the hubs (just Left and Right of where the spokes attach to the hubs, at the center of the wheel) and stick your thumb into the spokes and spin the wheeel. It should spin smoothly, almost silently without grinding or much noise. If not, the hub bearings need to be "repacked" (cleaned, regreased, reassembled and adjusted) by a bike shop.
Also, try moving the axle side to side in the hub. It shouldn't move more than a hair. If it moves the cones that hold everything together are too loose. (This is also a way to disguise worn bearing noise.)
Bottom Bracket (labour $40 + Parts $50 - $100)
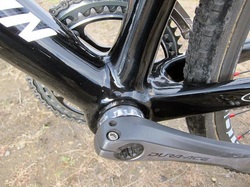
A bike's bottom bracket (BB) holds the spindle to which the pedal cranks (the arms) are attached. It runs though the 2” diameter tube down low on the frame. If the drive train (i.e. the front and rear derailleurs and the chain) is the brains of a bike, the bottom bracket is its heart. The left and right side of the BB contains bearings, either loose balls in older bikes or one-piece cartridge bearings in newer bikes.
A bottom bracket overhaul will cost $40 and a replacement bottom bracket or set of bearing cartridges another $50 plus installation.
TEST: Remove the chain from the small chain ring and drop it down to the inside of the small chain ring. Spin the crank arms. They should spin freely and easily.
Now hold a crank arm and turn it slowly. You should not feel any grinding or friction.
Finally, hold both crank arms and try to move them side to side. A well adjusted bottom bracket will not jiggle (and a loose bottom bracket could hide worn bearings and the need for an overhaul or complete replacement.)
Seized Seat Post or Stem
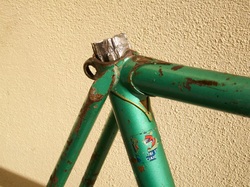
Easy to overlook but important. Make sure both seat post and stem move and can be adjusted. A seat post that has not been greased can seriously seize in the seat tube and render the bike useless (unless the seatpost position happens to suit you exactly. But it still trashes the resale value.). Ditto the stem (to which the handlebars are clamped.) Be sure to have an Allen key wrench with you so you can loosen and check these.
A seized seat post can usually be salvaged by a serious bike shop with lots of penetrating oil and patience. But it's an onerous procedure and is not 100% sure to succeed.
A seized carbon seat post or aluminum seat post in a carbon frame should be rejected immediately (as carbon is too brittle to withstand a forced extraction necessary.)
